Half Scale 17th Century Dress Recreation Part 4: The Bodice!

Hi everyone! 

It's been a long time I've posted an update about this project because I've been working on the most labor intensive portion of it: the bodice! I've just finished it today so now I can share my process with you. 

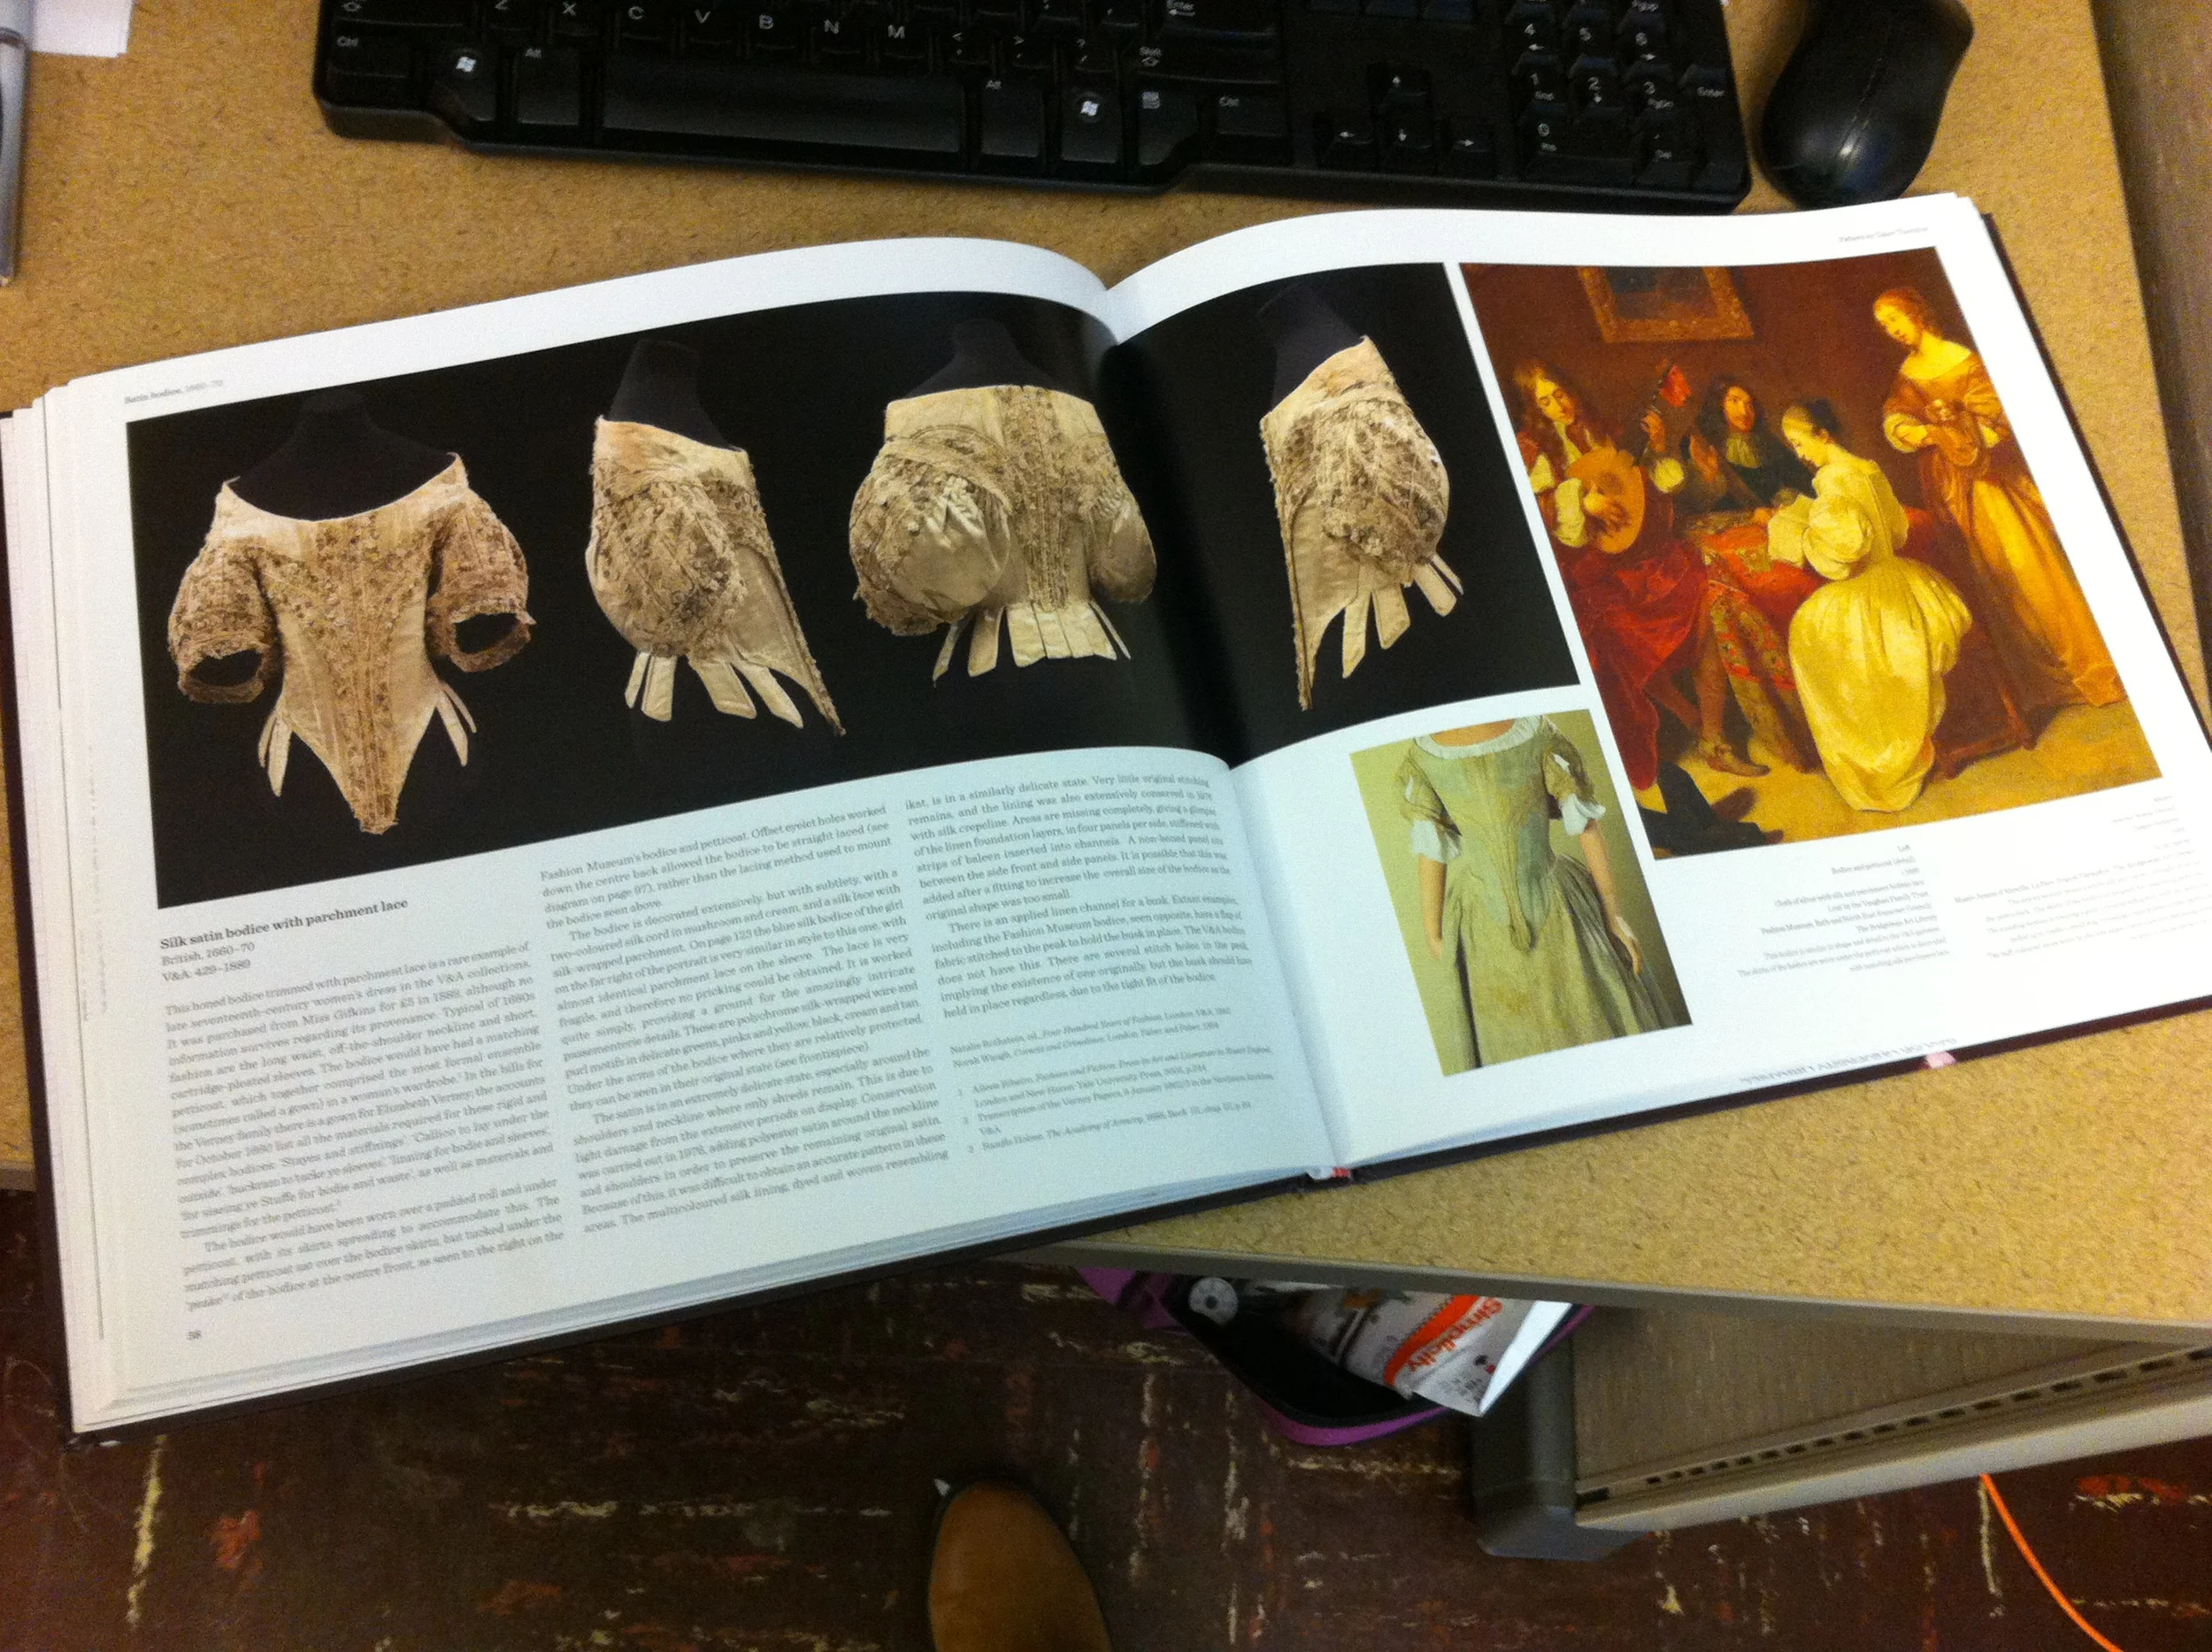
Now before I get into what I came up with I'd like to share my resources with you. There are a number of amazing books out there that detail historical costume patterns. Two of the best books on 17th century costume patterns are Jenny Tiramani and Susan North's (2013) Seventeenth Century Women's Dress Patterns: Book Two and Patterns of Fashion 1 (2005) by Janet Arnold. Both book authors use extant garments and developed very accurate patterns for garments from the 17th and 18th centuries. I relied heavily on Tiramani and North's (2013) book. The photos inside were gorgeous and the construction details were great!

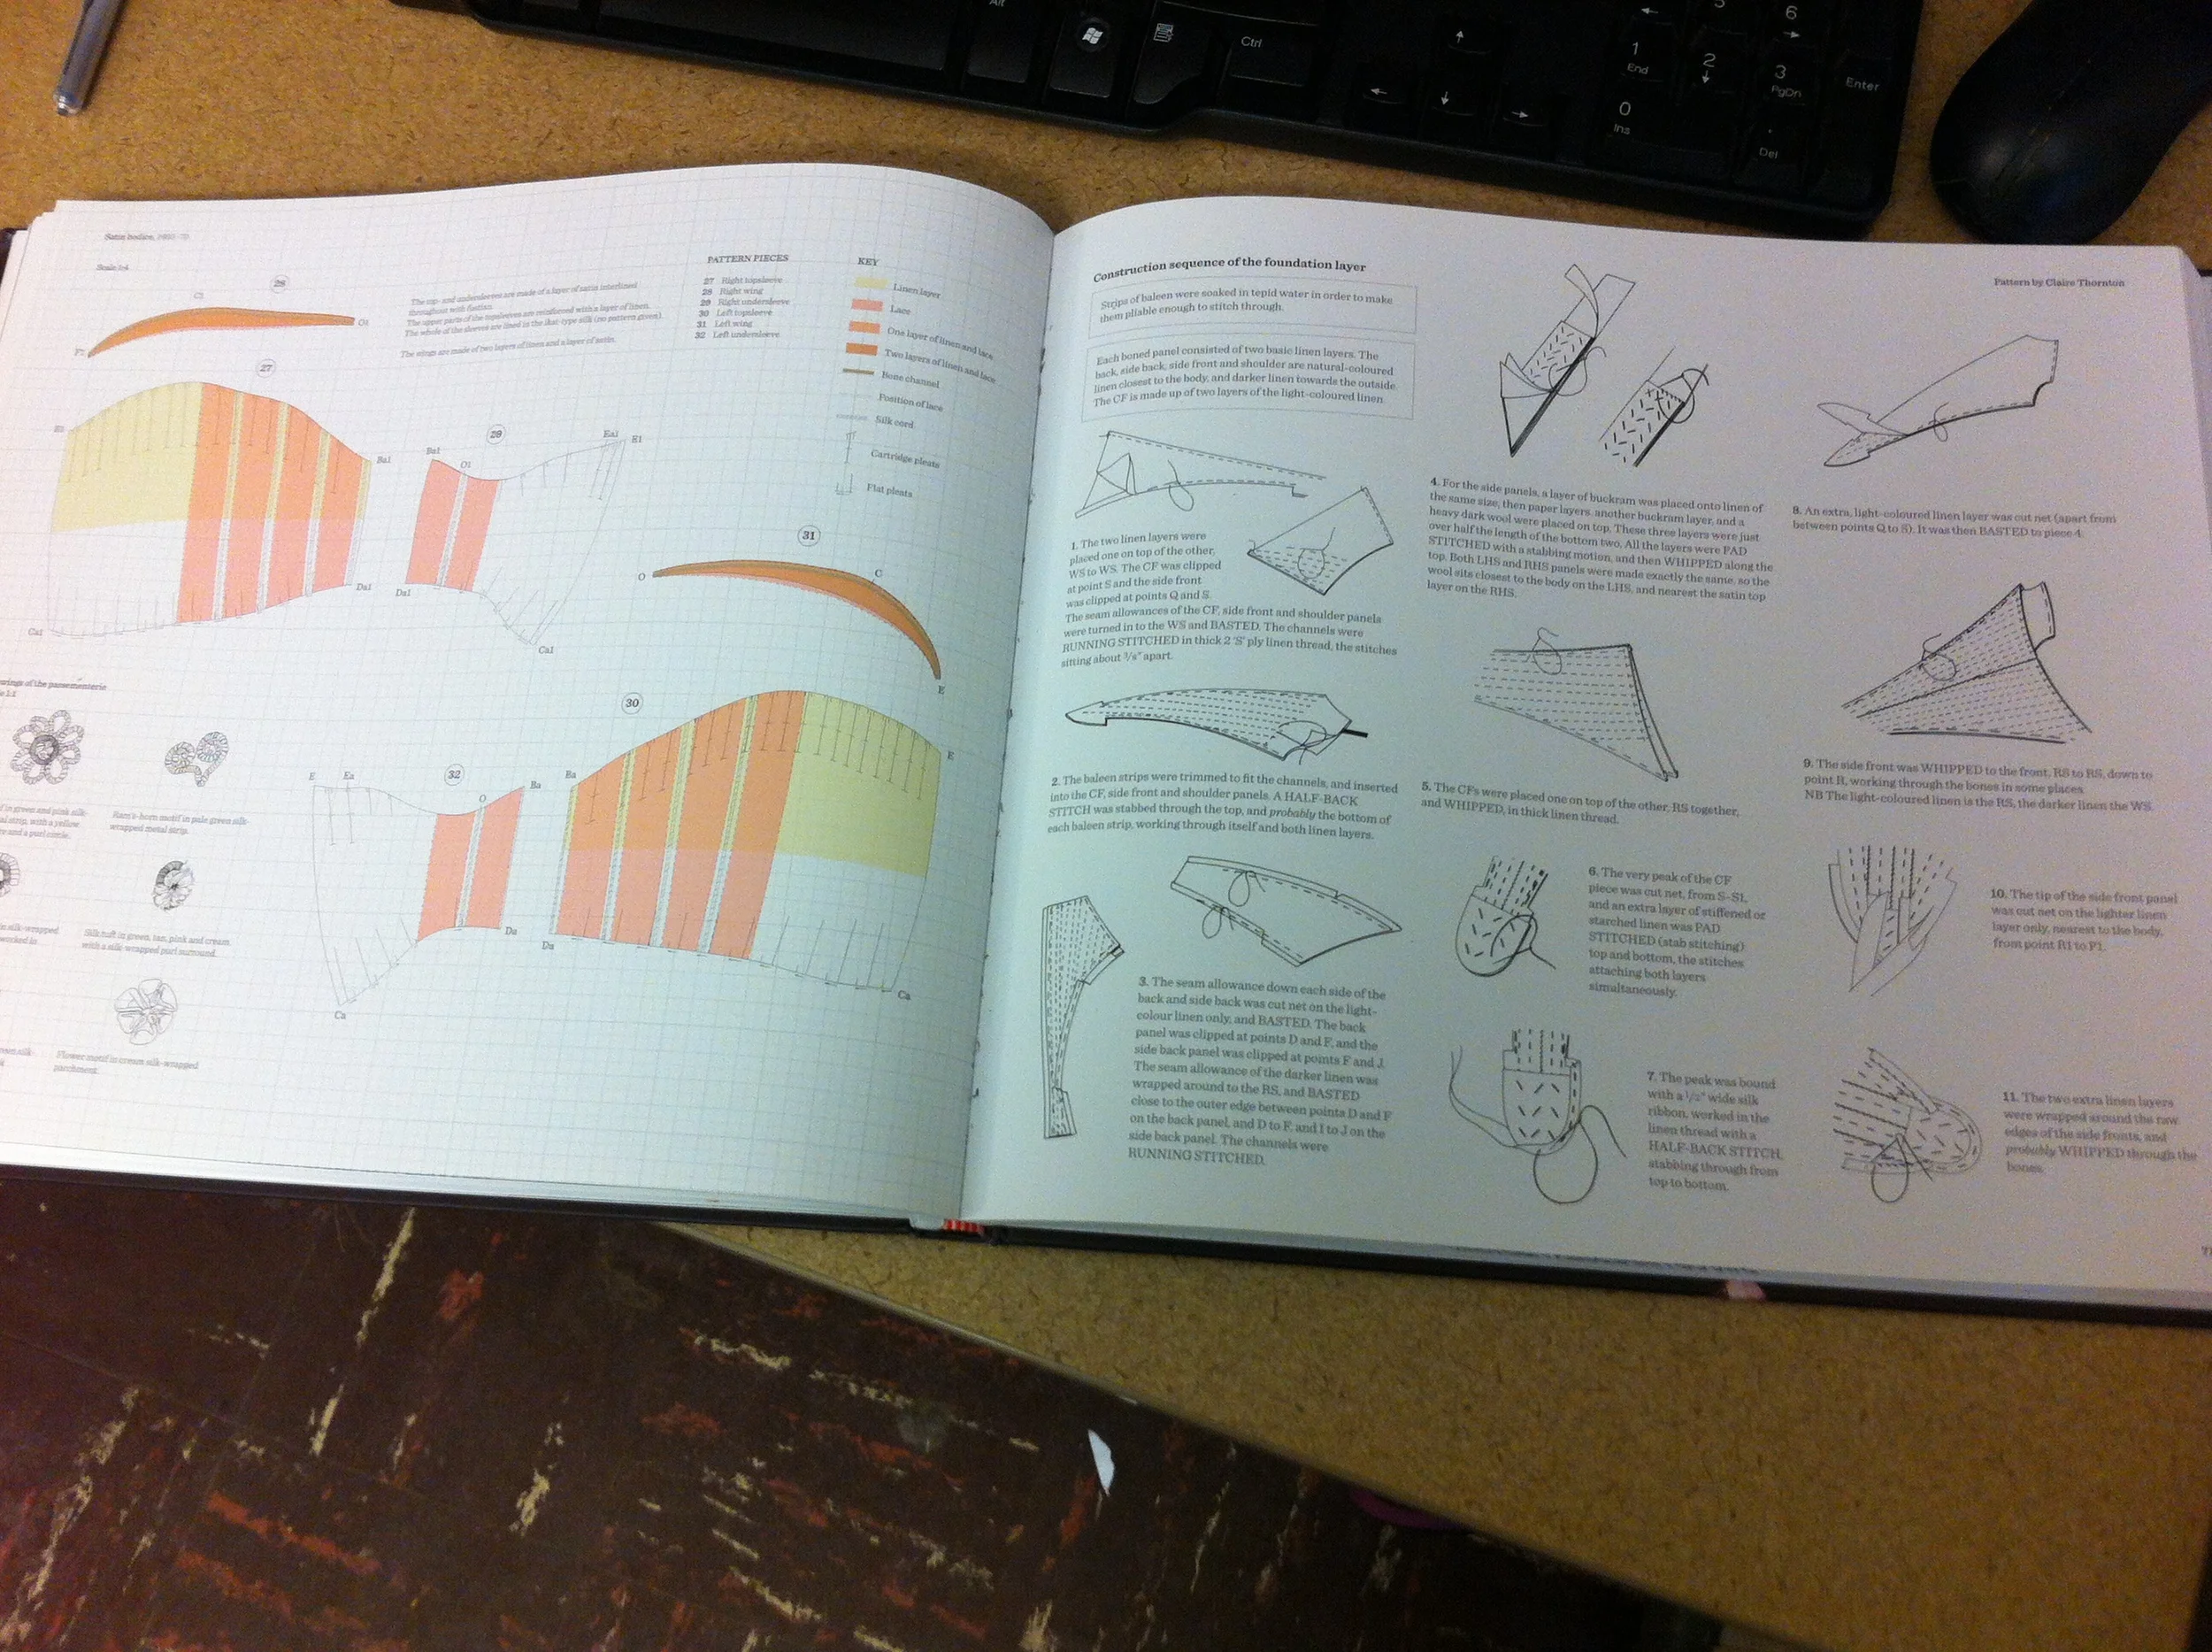
While both books had patterns that could be scaled up, I decided to drape the bodice since I was working with the half scale form and some padded stick on arms. I used the books for ideas on laying out the boning, the pieces I needed, and how to shape my sleeves. 

Now the extant pieces described in the book use a number of materials that were just not suitable for a display piece. After all this project is meant to be a learning tool for students to recognize 17th century dress. Details like internal support layers were not going to be visible to the students at the first glance. For example, the bodices in the 17th century were boned with whalebone. I don't know about you, but I'd have a tough time getting my hand on whalebone today! I opted for a cheaper alternative: plastic zip ties. Plastic zip ties are my go to for many costume bodices so I already had some I could use, and they provide ample support, especially in small places. I would not recommend them for a full scale version of this bodice or any corset that will be worn for long periods of time because over time they do warp with heat, but for photoshoot garments I think they're great.

The downside to choosing the plastic zip ties is that you cannot sew through them. Several steps described in the Tiramani & North (2013) book require stab stitching through the bones (which one could theoretically do with whale bone) so I had to change some of the construction to deal with this. The largest change was the placement of the eyelet holes. In the case of the extant pieces the eyelet holes are very close to the edge of the garment and are sewn through the bones. I could not do this so I placed the eyelets in a small strip between two bones as if I were making a more modern steel boned corset. 

The photo below is from the Bath Dress Flickr Gallery and it shows how the eyelets are sewn through the bones.


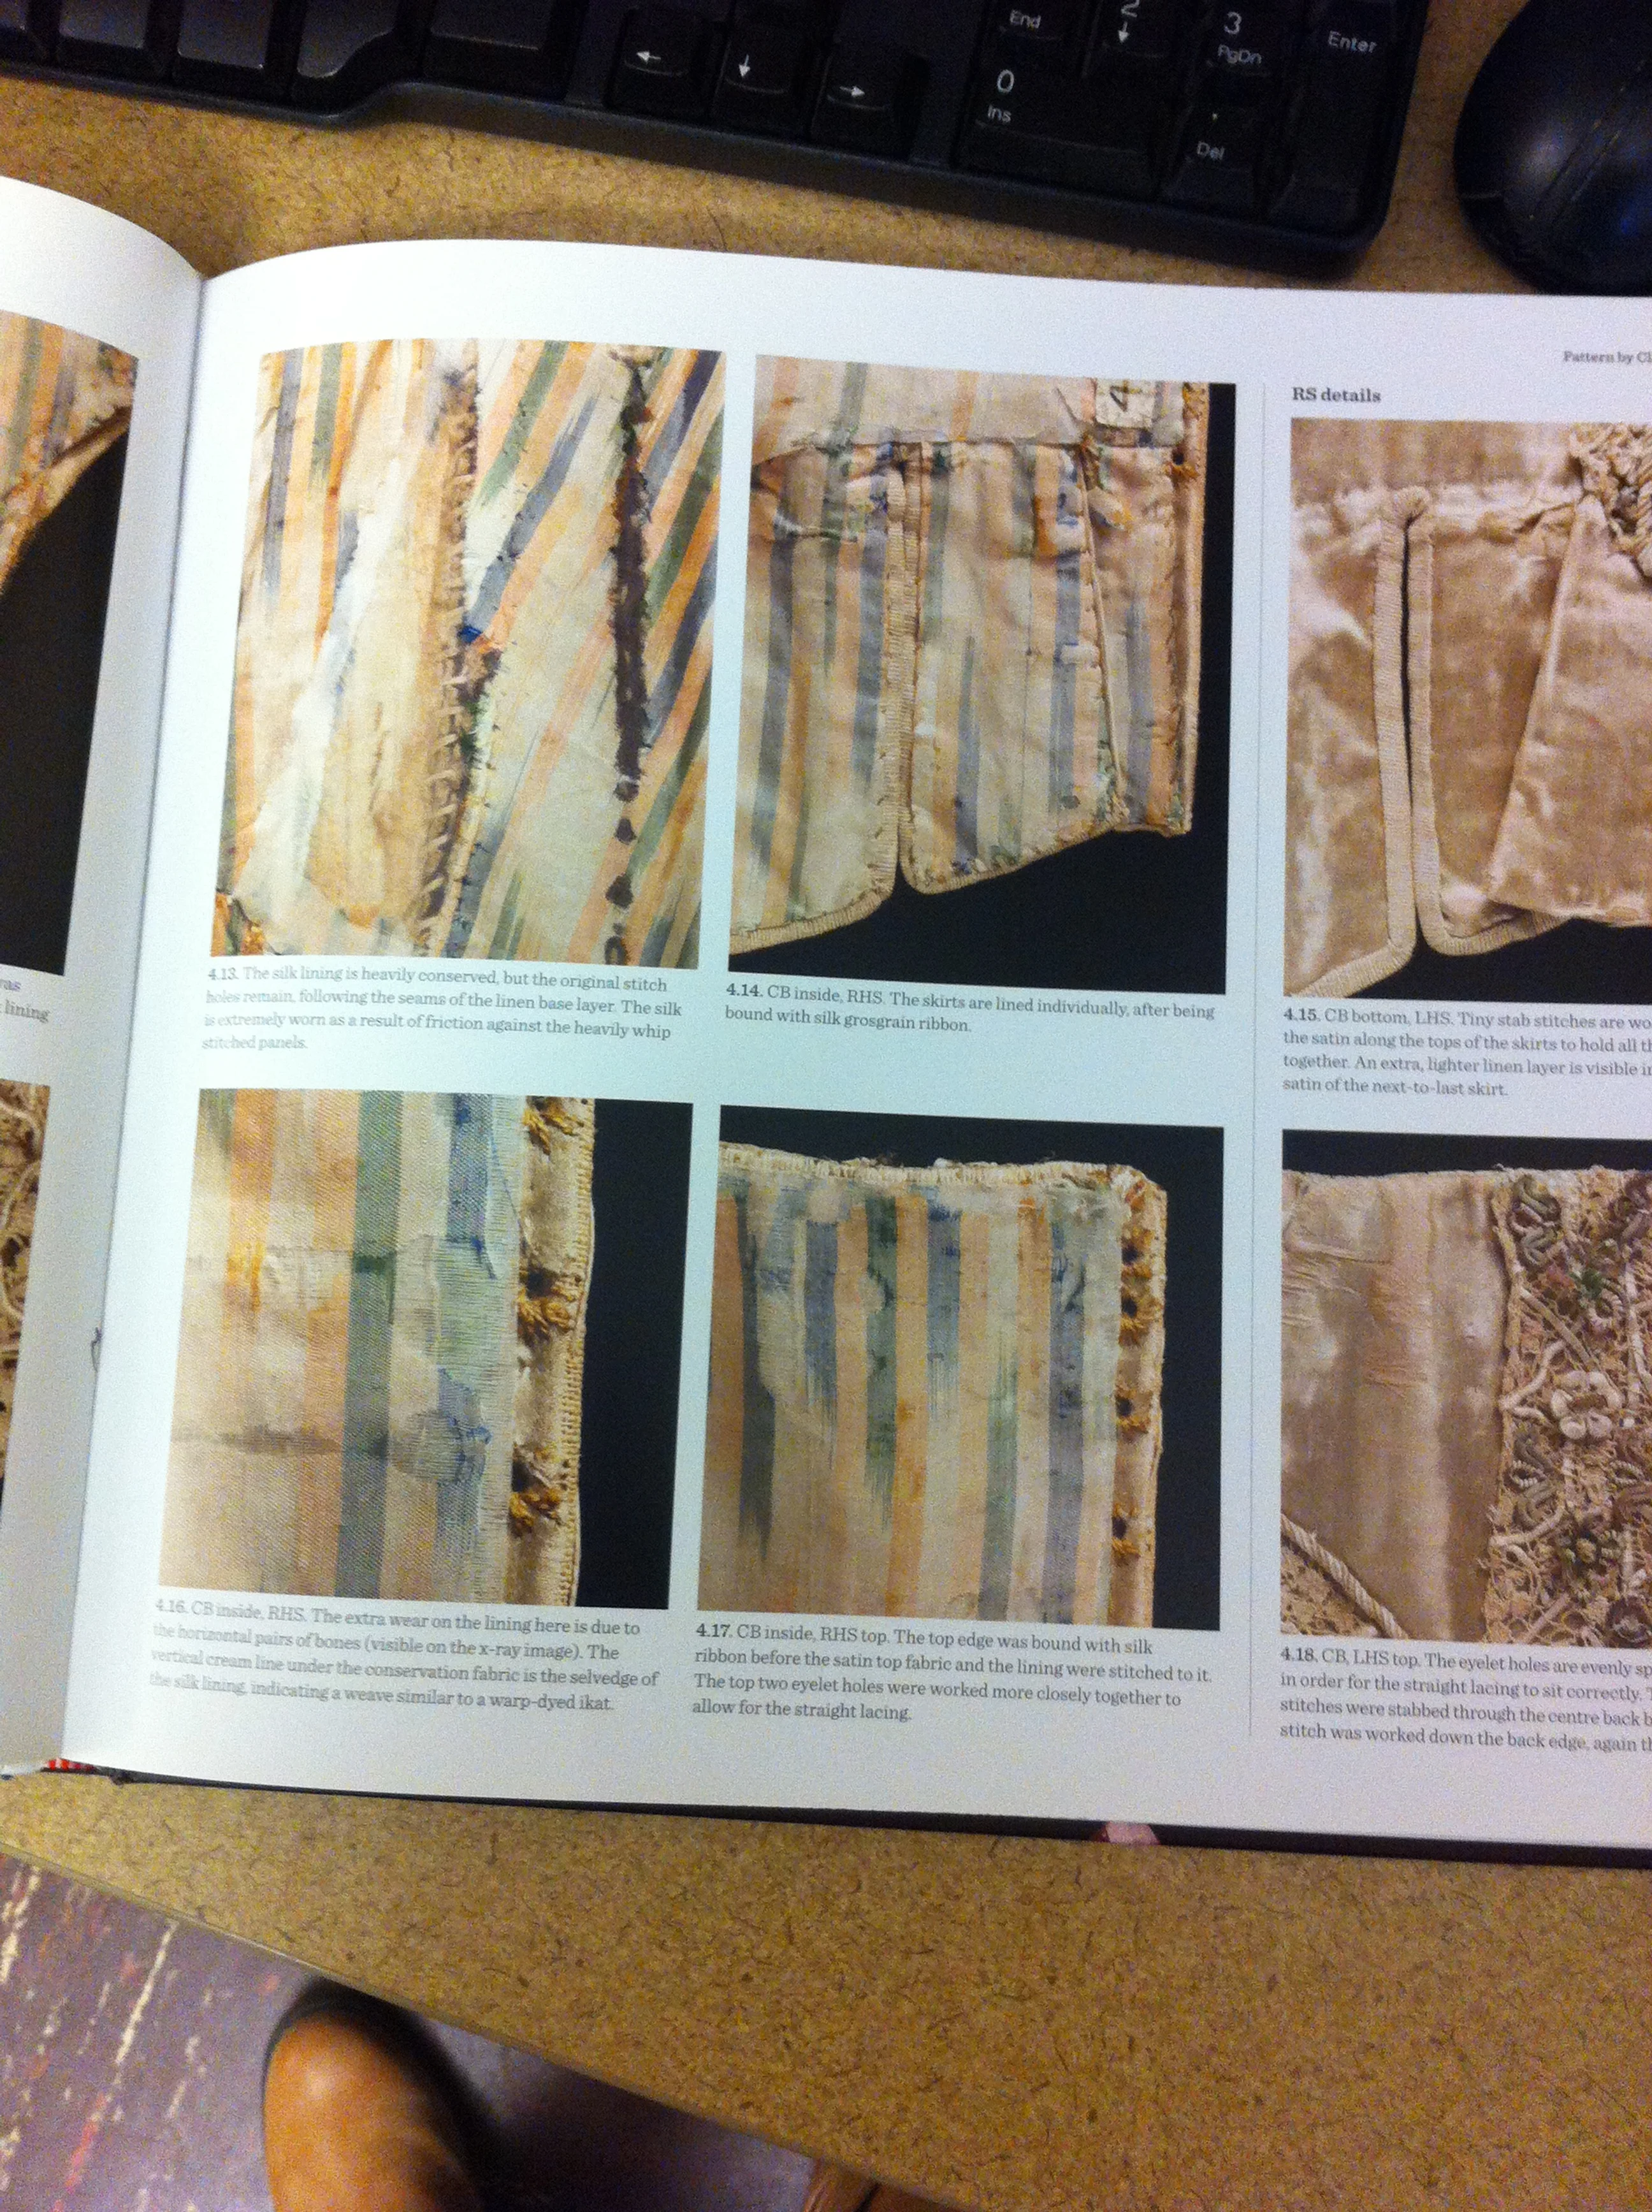
The extant pieces also involve a number of other small construction materials that were just not practical for my purpose. The Bath bodice and the bodice in the Tiramani & North (2013) book was underlined in layers upon layers of paper for stability. I could have theoretically done this, but I spoke to Dr. Pedersen and we both agreed that we'd like the option to be able to launder the piece if necessary and the paper would not have held up well in that case. We decided to omit it. For such a small scale garment there would be plenty of support with just the boning layer, the lining and the outer taffeta layer. 

So once I had my materials I drafted the bodice, checked the fit, and then cut out the material for the boning layer. The boning layer is 100% linen. I sewed the boning channels with a hand sewn backstitch, turned each seam allowance to the inside, then whip stitched each piece together along the seam lines. 

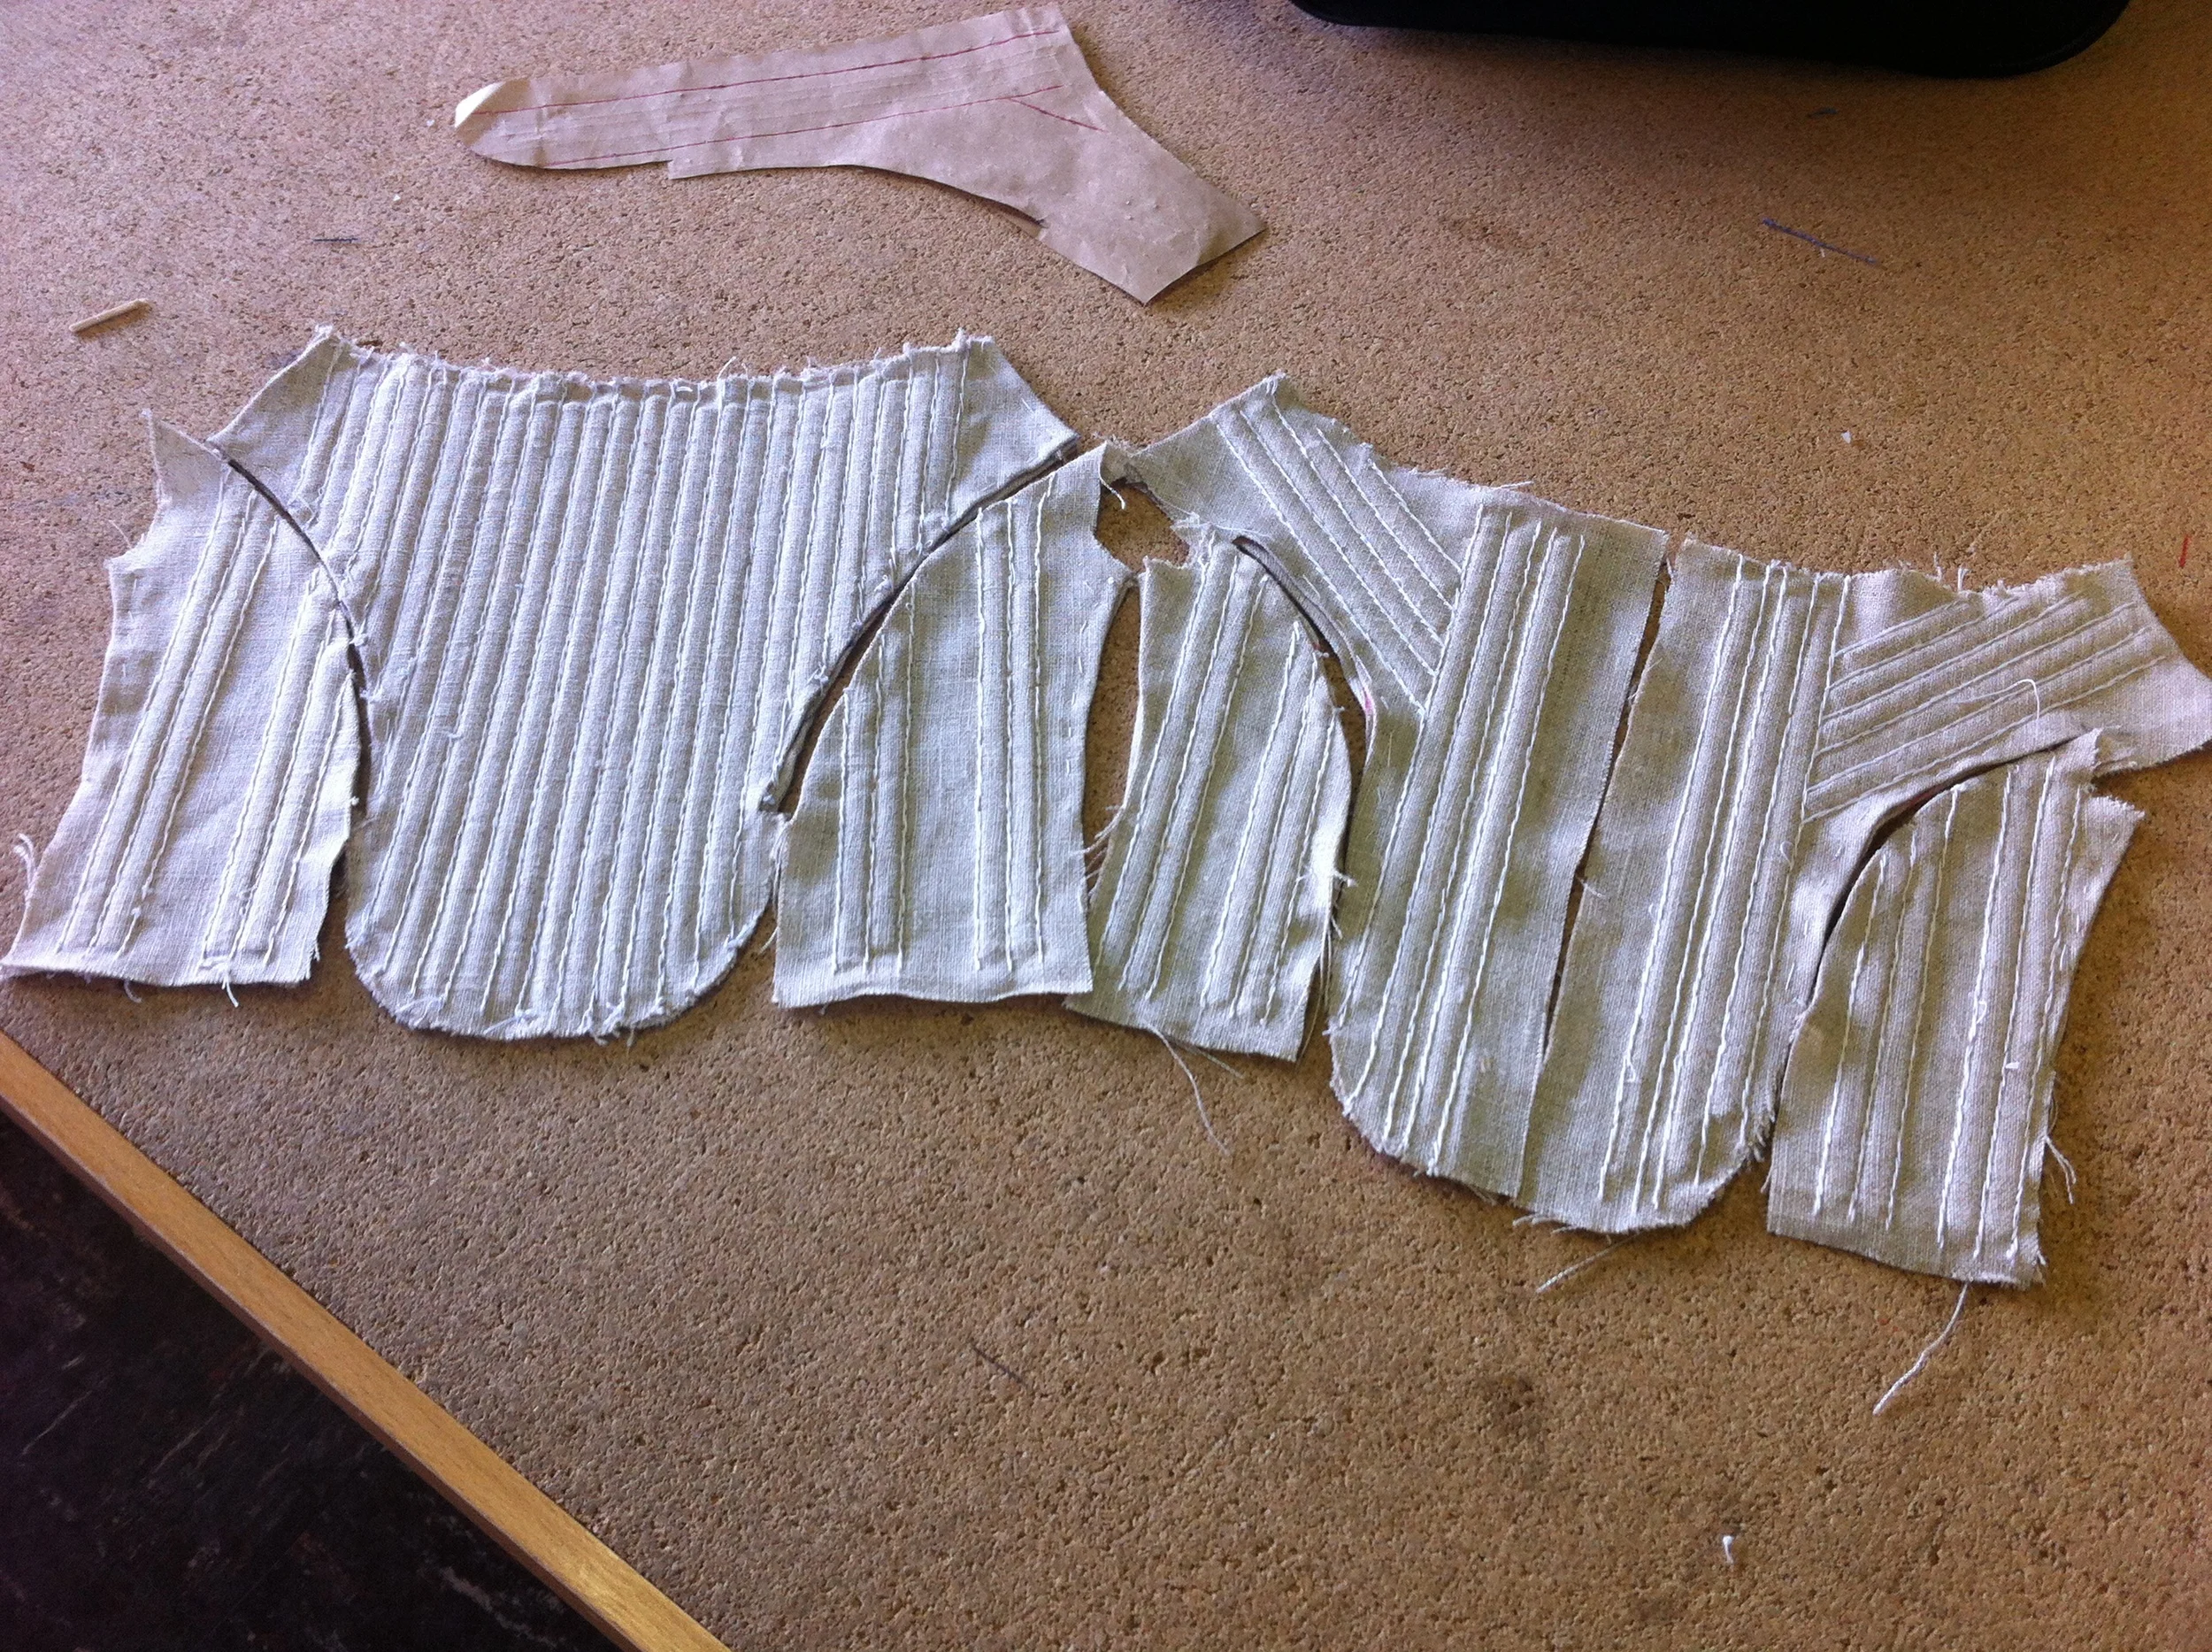
When I had the linen layer all sewn up I applied the outer layer by laying it flat over the bodice, turning under the seam allowances, and stab stitching it through all the layers. This follows the construction method outlined in the Tiramani and North book.

After this it came time to bind the tabs. Now on the Bath dress and in the Tiramani and North (2013) book they show the tabs bound with silk grosgrain ribbon before the lining is applied. The binding is only applied to the side tabs. In some places there is also binding along the neckline. I believe the binding for the neckline was mostly decorative so I decided to omit it and just bind the tabs. I did not have access to silk grosgrain ribbon and I find the ribbon offered at JoAnns to be kind of crunchy so I decided to just bind the tabs in the linen used for the interior boning layer. 

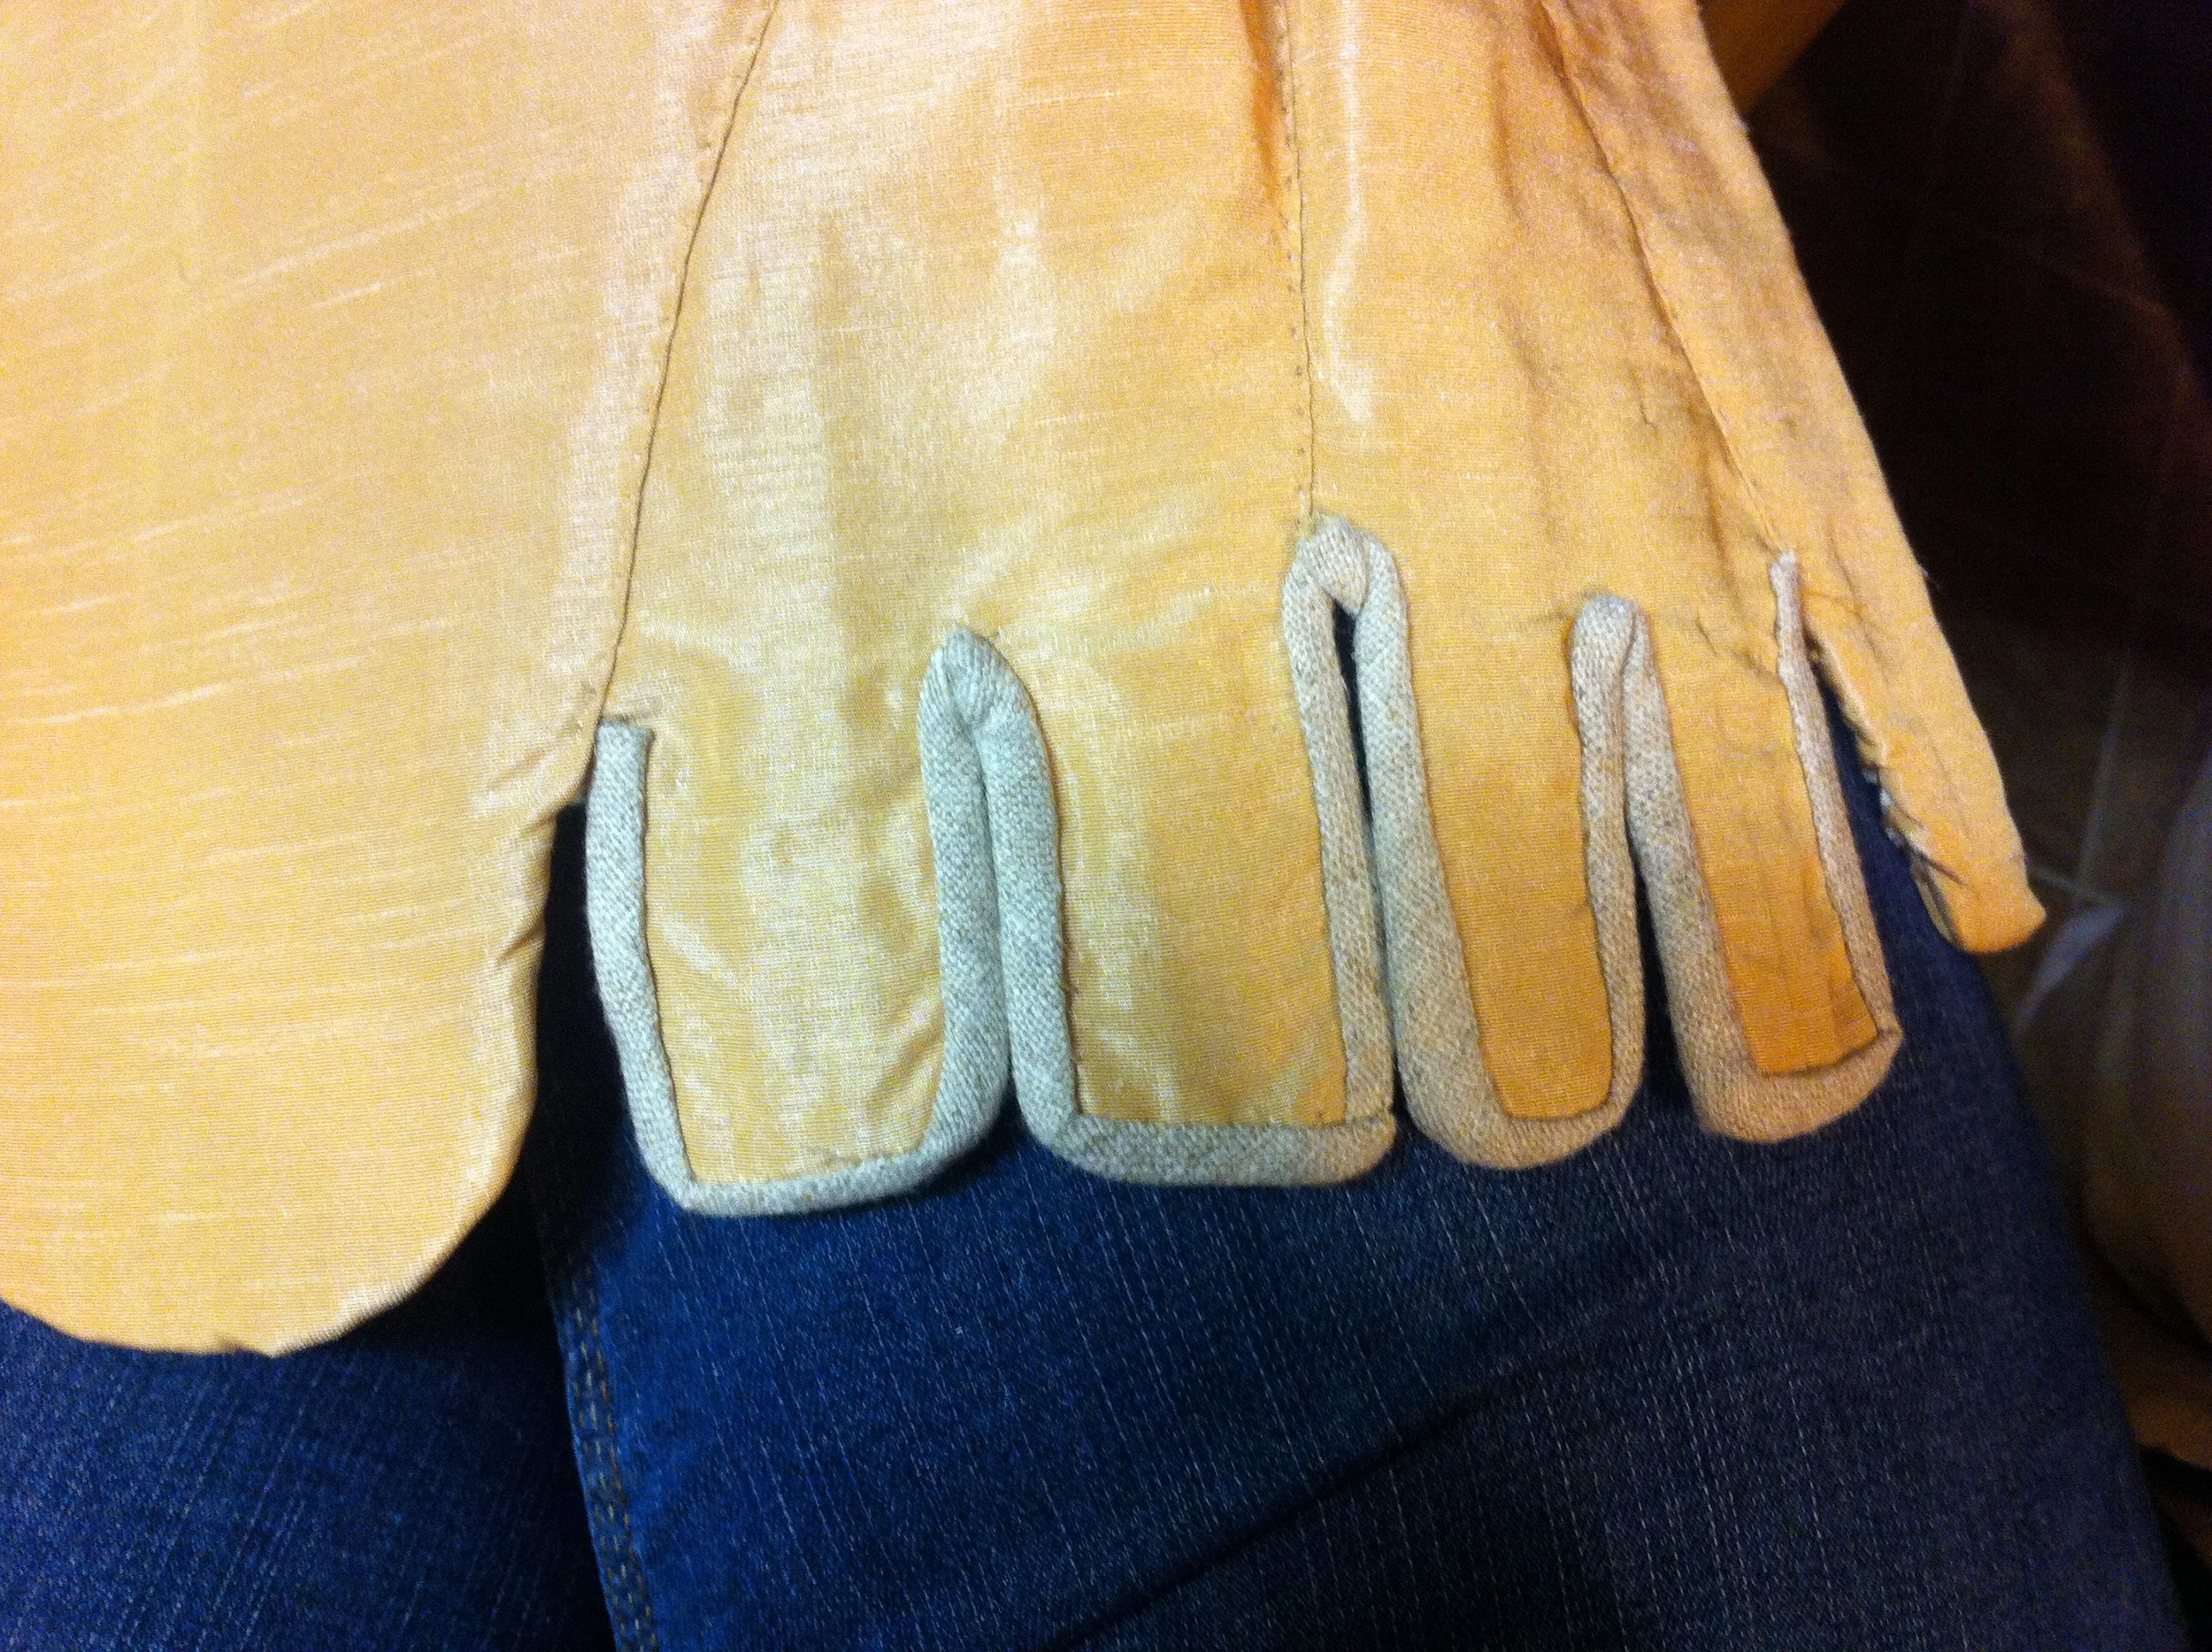
As you can see my tabs are kind of funny shaped. They're part rounded and part square. I had some trouble with keeping the edges nicely shaped. I've certainly got some room for improvement. I'll talk more about my shortcomings later since I think they're important to address. 

At this point I applied the decorations to the front of the bodice. In an attempt to keep this project inexpensive, I dug into my stash of metallic ribbons and trims. What I came up with were the only trims that looked appropriate and were similar colors. I also went back and looked at paintings and saw several paintings that used pearl decorations so I broke some of those out as well. 

For the draping of the sleeve I went off of the pattern in the Tiramani and North (2013)  book, made a mock up, made them even more full, lost my pattern piece, had to remake it, then finally ended up with something I liked. The construction of the sleeve is also a place where I deviated a bit from the historical methods. In the Bath bodice and in the Tiramani and North book the cartridge pleats by the top of the armseye are reinforced with paper and some added layers of muslin. The taffeta I was working with has a lot of body to it, and was poofing out quite a bit without any added layers. I also did not want to weigh down this poof with layers I felt weren't needed, so I omitted them.

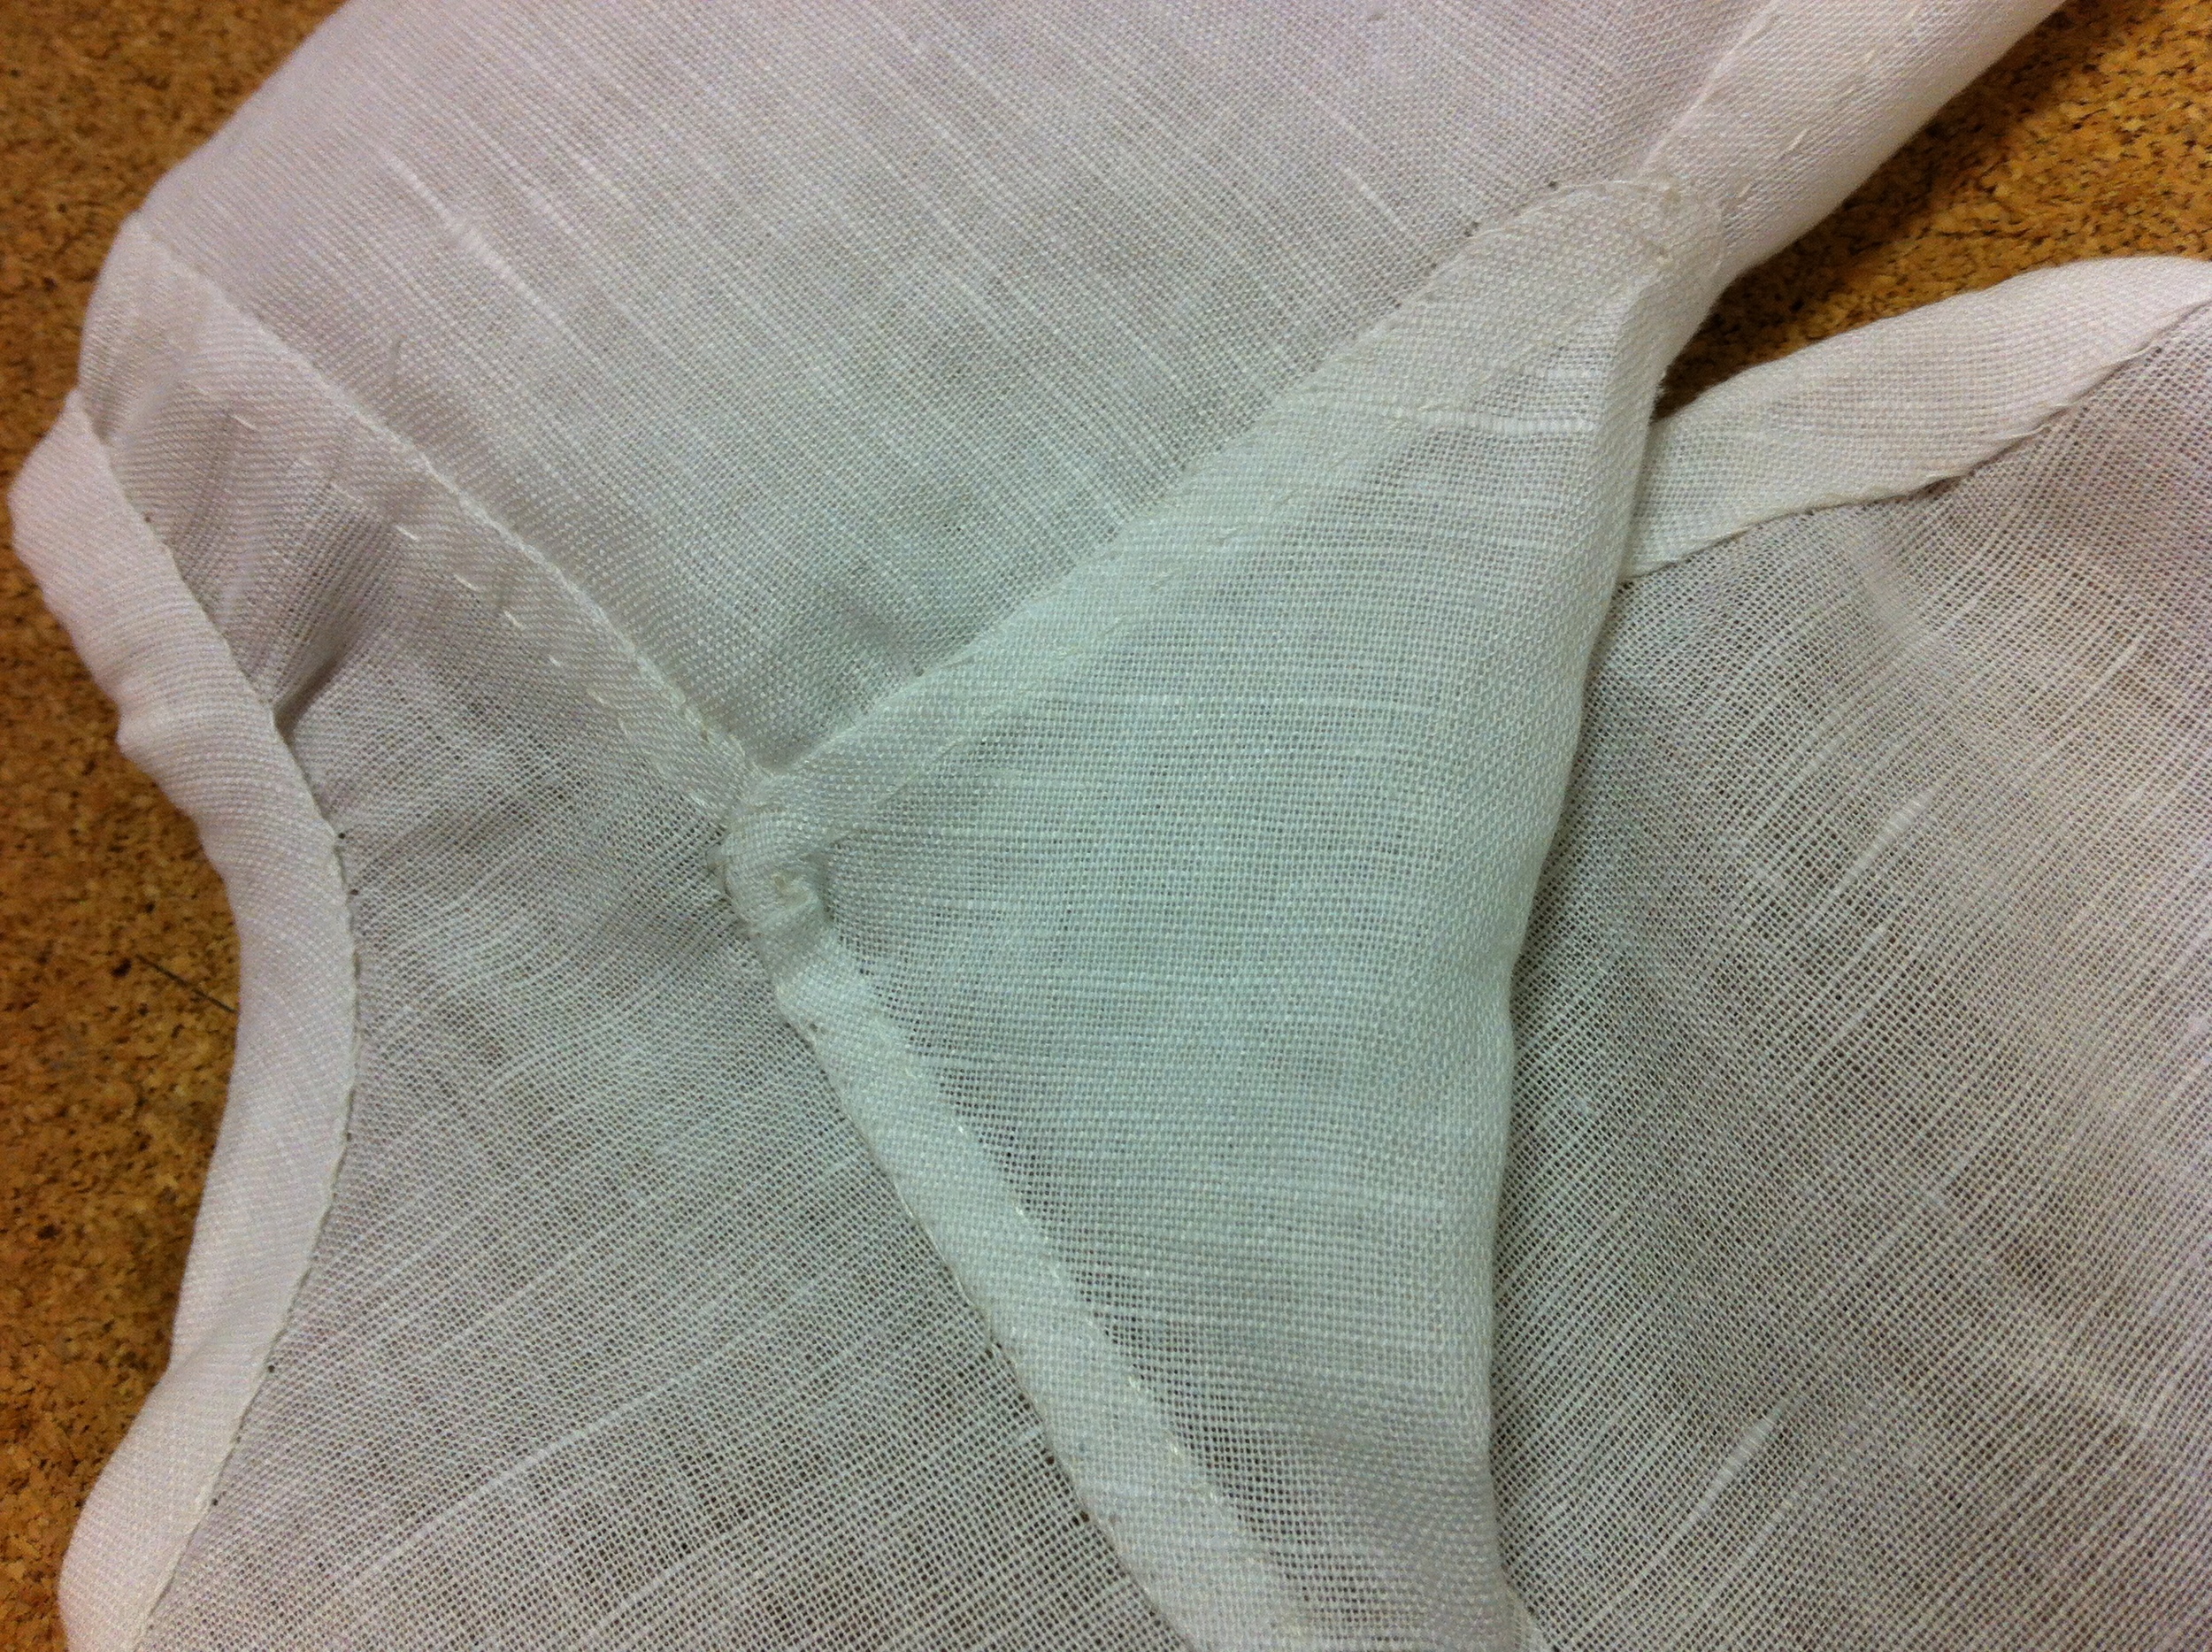
Finally it came time to line the bodice. The lining was applied in a similar way to the out layer but instead of stab stitching through all layers, I  placed one piece flat on top of the other and whip stitched the seam allowance to the piece next to it. I also used the lining construction detailed in the book, wherein each tab is lined individually. I used the same white handkerchief cotton I used for the chemise. 

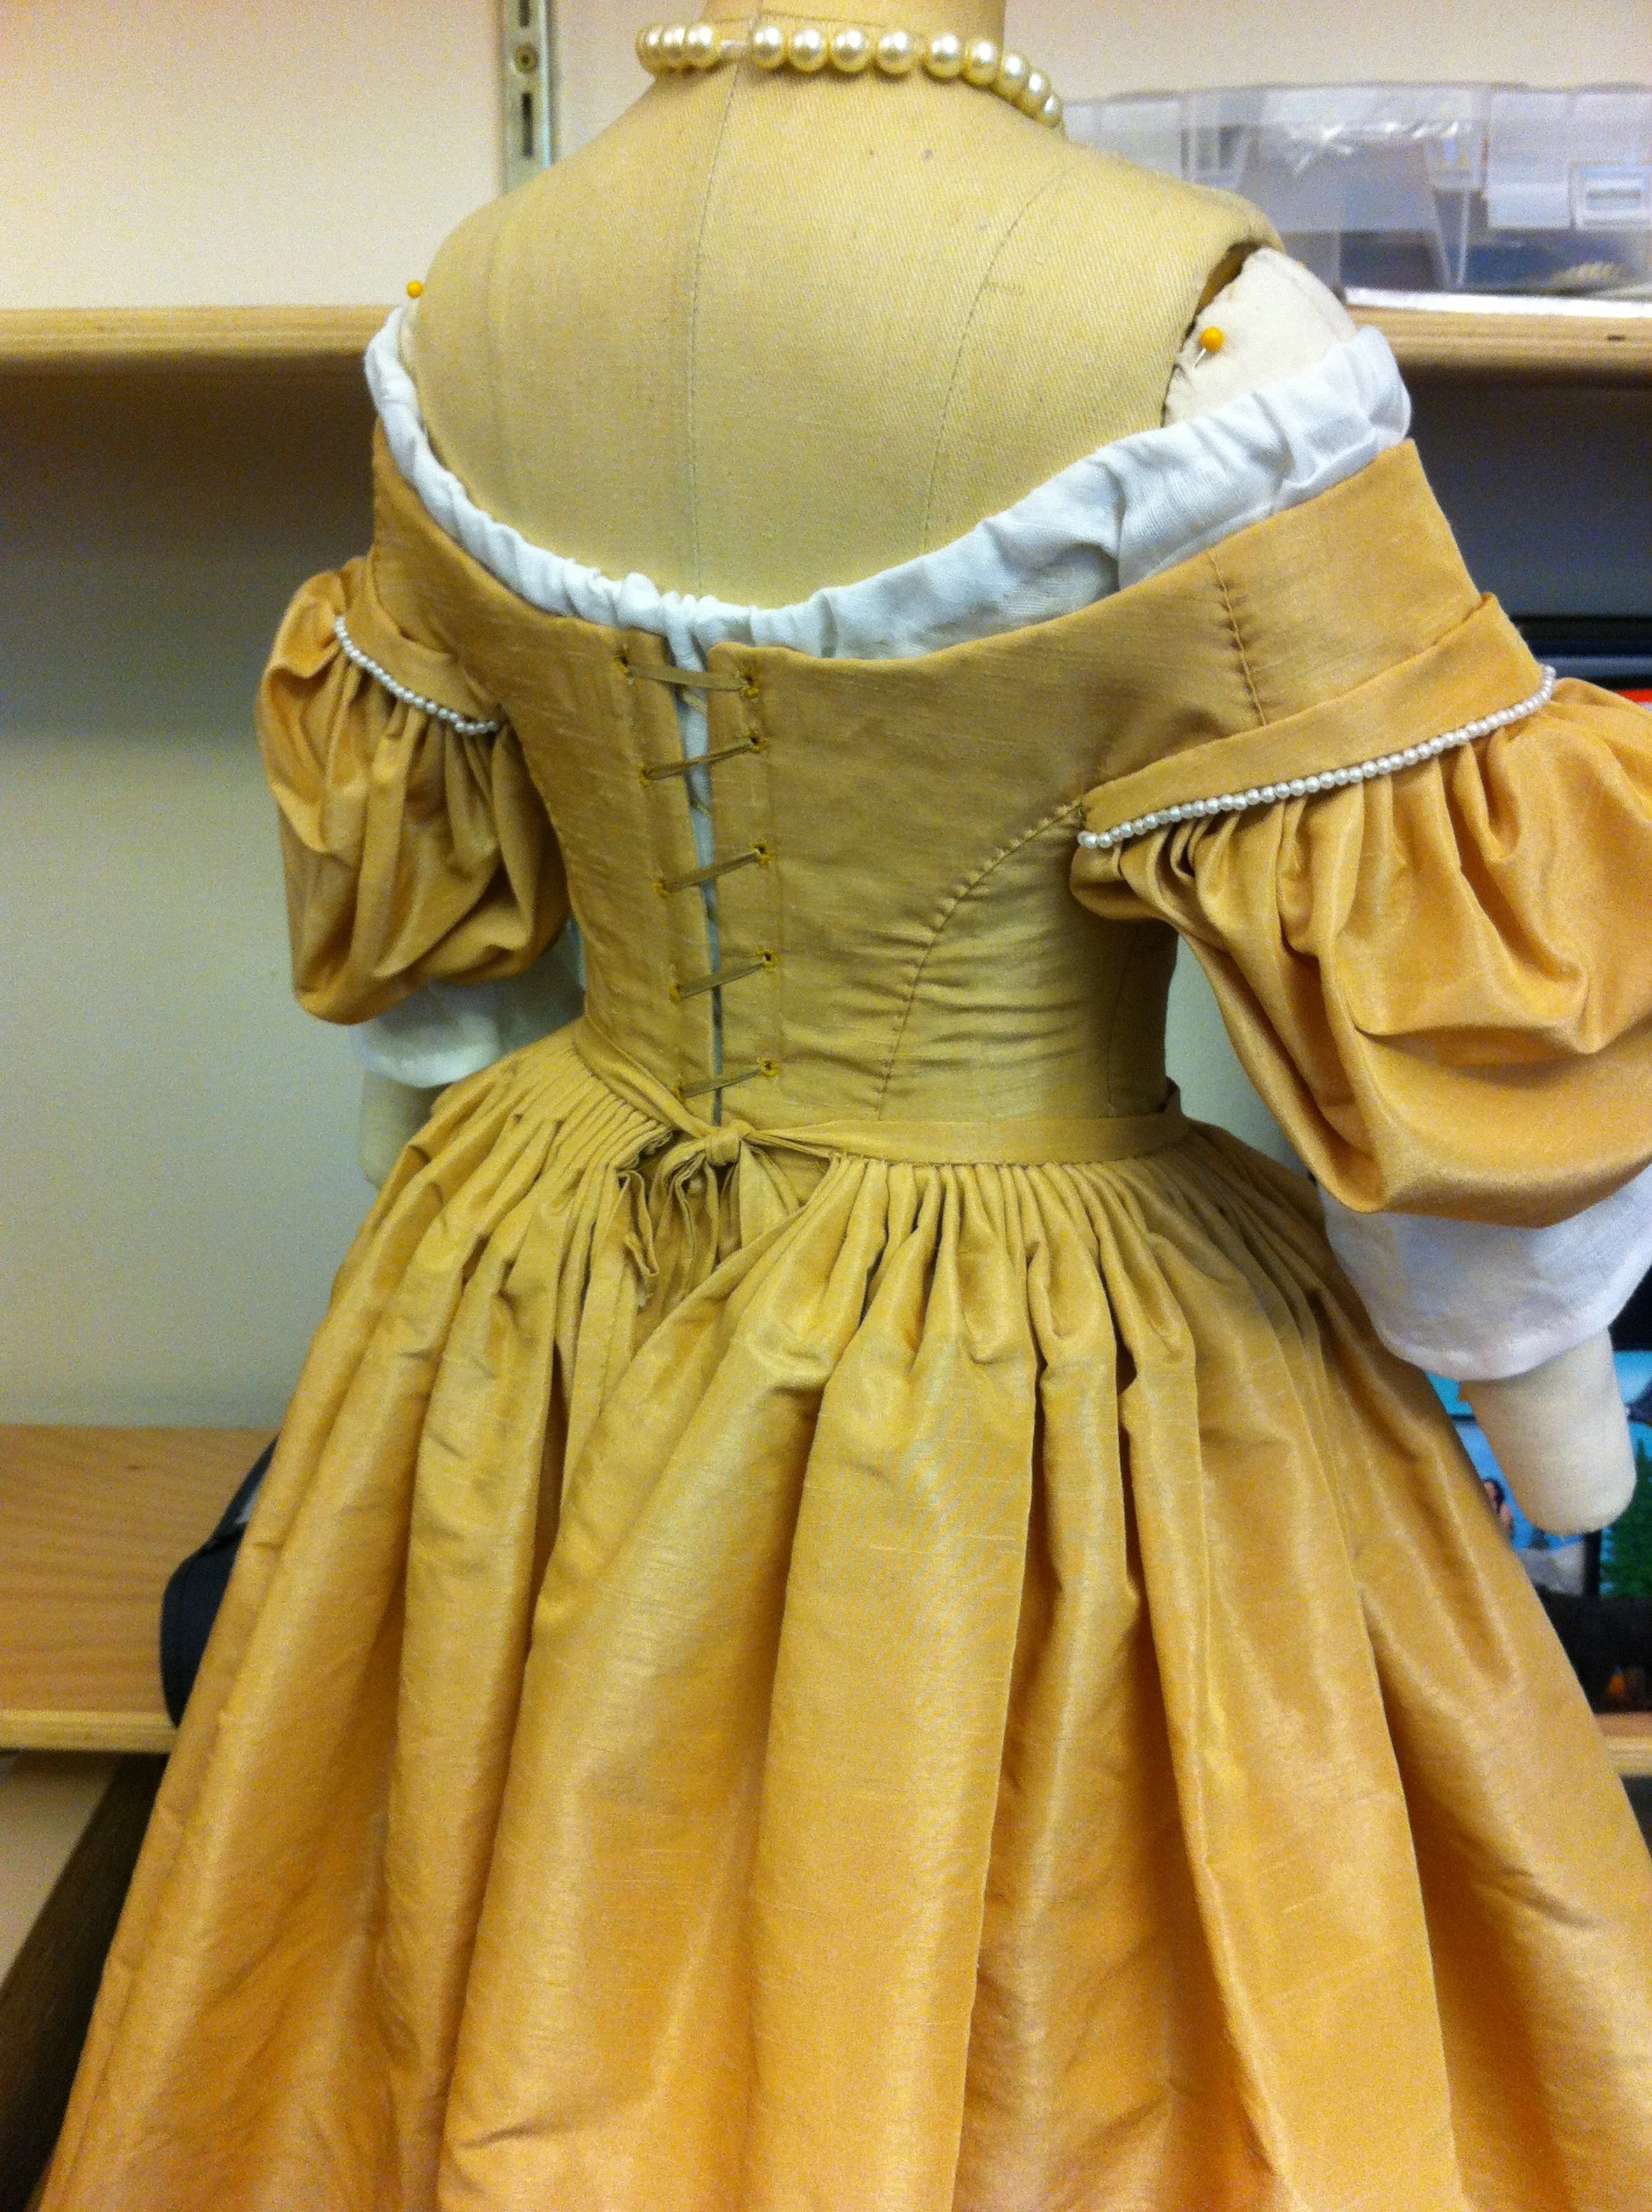
Once the piece was lined I applied hand sewn eyelets down the center back in a spiral lacing layout. That finished off the piece!

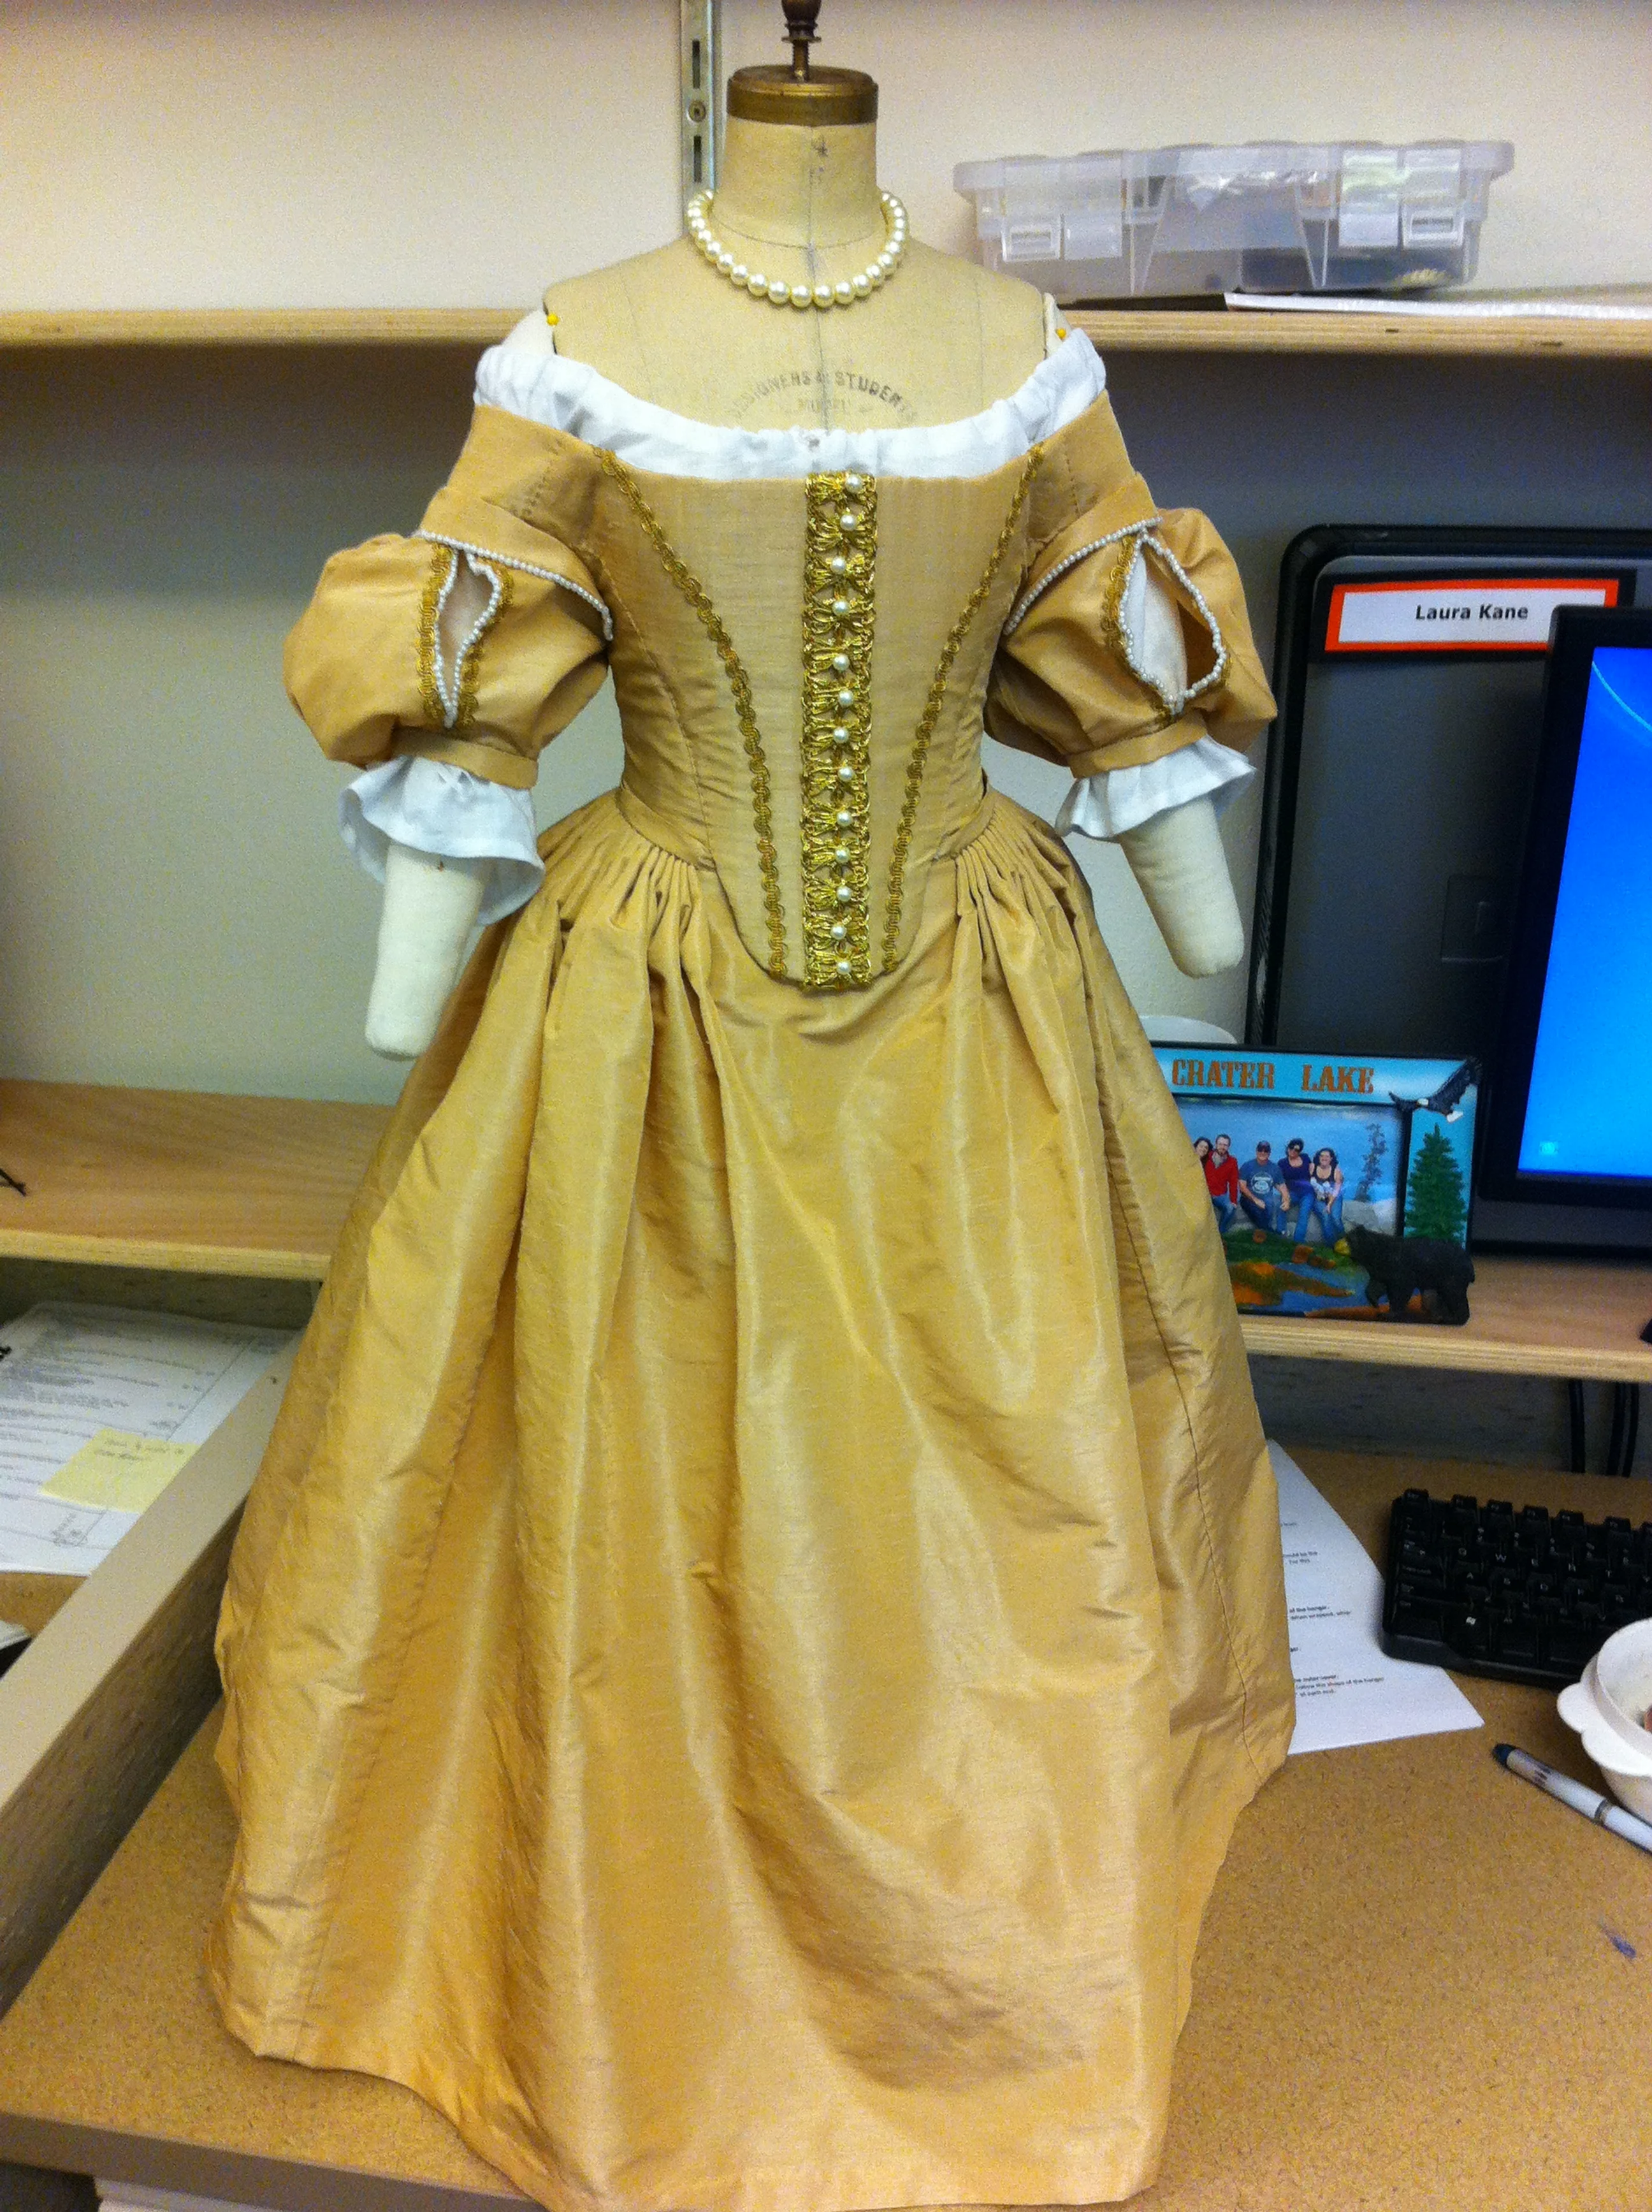
Now onto my thoughts of the finished piece and what I'd change. I'm constantly critiquing my own work looking for places to improve. The first thing I'd change is the shape of the front point. I simply made it too rounded and not pointy enough. I should have really exaggerated it. This time period is really defined by the super pointed jutting out front point and I could have gone to town!

Secondly I think I made the shoulder piece over the sleeve about a half an inch too wide. I think that piece is just too big. The proportion of that piece to the shoulder wing is off and it bothers the crap out of me. 

Finally when I made the skirt I was using a different half scale form and when the waist tie closed the opening of the skirt in the back closed all the way. That dressform was just an extra in the sewing lab and not one of Dr. Pedersen's from the collection. The one from the collection ended up slightly larger so the skirt does not quite meet up together in the back. It's not super noticeable but still. Rawr.

Overall I'm really happy with it and I can't wait to see it all set up in a display case! The next step is putting together a more in depth research abstract and submitting it to Costume Society of America's next symposium! Wish me luck!

References:

Arnold, J. (2005). Patterns of fashion 1: Englishwomen's dresses & their construction c. 1660-1860. London: Macmillan.

Tiramani, J., & North, S. (Eds.). (2013). Seventeenth-century women's dress patterns: Book Two (Hbk. ed.). London: V & A Pub.


Half Scale Seventeenth Century Dress Recreation: Part 3- The Skirt

Hi all! Time for another update!

Once I had the chemise finished I decided to move on to the skirt so that when it was time to drape the bodice I would be able to drape it over the skirt. Now before I go into the skirt lets talk about fabric.

Historically the formal dresses in the 1660's would have been made out of silk. Extant garments in the V&A and the Museum of Costume are both made of silk: one of a silk satin and the other of silk tissue. According to The Evolution of Fashion: Pattern and Cut from 1066-1930 (Hill & Bucknell, 1967) the fabrics used during the 1660's were "taffetas, velvets, silks and satins- some substantial, others soft and capable of being finely pleated" (p. 102). Now note that silk is a fiber not a weave, so those taffetas, velvets and satins were likely made of silk. Now this being a project for school and meant to be easy to maintain and relatively inexpensive to make I opted to not use silk for this project. I did however want to use something that would hold pleats well, look similar to the texture in the paintings and resemble a silk taffeta or silk satin. Also, I was pretty limited to whatever my local JoAnns store had to offer. I ended up finding this really pretty gold polyester taffeta in the red tag section and snatched it up. It has a slight sheen and nubby texture so it resembles silk dupioni a little bit but most importantly it pleats beautifully! I also think it would look gorgeous with some pearls sewn onto it!

So looking at some of the paintings I posted earlier some skirts appear to have a series of small knife pleats at the waistline and others appear to have cartridge pleating. The two different pleat types are sewn differently, with cartridge pleating being able to use more fabric in a smaller amount of space.  Hill & Bucknell (1967) describes the skirts of the 1660's as "bullet-pleated" (p. 102), which is a type of cartridge pleat. Period Costume for Stage and Screen: Patterns for Women's Dress 1500-1800 describe the skirt of the 1660's as cartridge pleated (Hunnisett, 1991). The extant garment from Bath has a skirt made of knife pleats with a double tied waistband. Interesting!

These images are all from http://smg.photobucket.com/user/sapphorama/library/Z%20research/1660s-silver-tissue?sort=6&page=3


Since I've never done cartridge pleating and have always wanted to, I decided to go the catridge pleating route! Whoohoo!

I used the cartridge pleating method outlined in Period Costume for Stage and Screen (Hunnisett, 1991) and this seriously awesome website: How to Sew Cartridge Pleats

In order to figure out how large I wanted my skirt to be a made a small section of cartridge pleats and gathered them up to see how much fabric I'd need to cover an inch. About 6-7" pleated up into an inch so I needed quite a bit of fabric.

Now I wanted to have an easy opening in the back with a waist tie so Dr. Pedersen could easily take the skirt on and off from the form. Since the whole dress is relatively small and light, I decided to omit the second waist tie like the Bath dress has and just go with a simple slim waist band that ties in the back. I made my skirt in three sections, with a larger front panel and two back side panels so I would have a center back seam. 

Now if I were making this a full scale garment I would have likely also made a bum roll to go under the skirt to poof out these pleats. However this garment is simply for teaching purposes and with the body of my fabric it was becoming clear that I would not need the bum roll to hold the weight of the skirt out so I decided to omit it. 

To give the pleats some more oompf (that's a technical term you know) I put a strip of cotton muslin in between the folded back top edge of the skirt. I handsewed it in with a running stitch and then turned it under so it also served as a finish for my edge. 

Now in the photo above you can also see how I stitched the side seams. I used a hand sewn running stitch, trimmed one seam allowance, then folded it over and sewed a small prick whipstitch to anchor it down. I used the same whipstitch to finish the hem as well.

I decided I wanted to leave a 4 inch flat panel on the front of the dress for the point of the bodice to lay over. I started my pleating from that point and went towards the center back.

For the waistband I took a long strip of the gold and made a small tube turned it inside out, finished the ends, and then stitched the underside of the pleats to the waistband. 

And voila! Finished skirt! I'm very happy with the way it came out. Cartridge pleating was much much easier than I always thought it would be and I really love the finished look. I can imagine it being a little more difficult with heavier fabric and in full size but really, it just takes patience. 

As you can see the photo below also has the mock up of the bodice, which will be talked about in another post! 

Stay tuned for more! 

 Hill, M., & Bucknell, P. (1967). The evolution of fashion: Pattern and cut from 1066 to 1930. London: Batsford;.Hunnisett, J. (1991). Period costume for stage & screen. Studio City, CA: Players Press.


Hill, M., & Bucknell, P. (1967). The evolution of fashion: Pattern and cut from 1066 to 1930. London: Batsford;.

Hunnisett, J. (1991). Period costume for stage & screen. Studio City, CA: Players Press.


Half Scale 17th Century Dress Recreation: Part 2- The Chemise

When doing historical recreation it is important to keep in mind all the layers that went under the garment. This is especially important when corsets, hip pads, and hoop skirts change the silhouette of the human body. The silhouette of dress in the 1660's was mostly controlled by a heavily boned bodice, hip pads, full skirts and full sleeves. Before I can go about draping the bodice and skirt on the form I need to create the bottom most layer: the chemise.

The chemise was worn next to the body and protected the delicate fabrics of the outer dresses from sweat and bodily odors. Since bathing was not common practice the chemise was usually heavily perfumed to combat unpleasant body odors

 In the 1660's the neckline of the chemise was visible above the top edge of the bodice and the sleeves could be seen through slits of the sleeves on the outer dress and at the bottom edge by the elbow.

Linen was the most common fiber used for the chemise, so in my recreation I will be using a lightweight tissue linen. 

For my reference on how to make the chemise I consulted several books: Period Costume for Stage and Screen, The History of Underclothes, and Underwear: Fashion in Detail. There are no surviving examples of chemise's (chemi!?!?) from the 1660's in particular so my design is a combination of several different descriptions of the chemise style worn in the 17th century. 

Period Costume for Stage and Screen details a chemise with underarm gussets, side godets, and a drawsting neckline with a small ruffle. The sleeves are gathered on the upper edge by the armseye and gathered into a bound cuff that falls around elbow length. The History of Underclothes details that chemise sleeves were eventually left plain and were tied around the arm with ribbon in order to make a small ruffle. 

I decided to base my design mostly on the pattern detailed in Period Costume for Stage and Screen, with a few small changes. I created a drawstring neck opening without a ruffle since I liked the plain look of the chemise shown on the neckline of several of the gowns in the paintings I posted earlier. I also tried out both the ribbon tied sleeve and the bound sleeve. I decided I liked the look of the ribbon tied sleeve more.

I created a mock up in plain cotton muslin to check the fit and the sleeve styles and then made up the final version in white handkerchief linen. The final version was sewn by hand with a running stitch for the seams. I used a small whip stitch to tack the seam allowances down. The drawstring at the neck is drawn through two hand worked lacing holes. 

And now the final finished chemise! Next will be the draping of the skirt!


Half Scale 17th Century Dress Recreation: Part 1

Hi All!

For the winter term at Oregon State I am working as a GTA for Dr. Elaine Pedersen, editor for the Clothing and Textiles Research Journal, the teacher of the costume history classes, and the curator of the historical costume collection here on campus. As part of the collection she has a number of half scale historical garment replicas that she uses as a teaching tool for assignments in her classes. For the next month I will be working on a new addition to her half scale garment collection! This will be my first time delving into historical garment design and I will be documenting some of my research process here. 

Dr. Pedersen requested a 17th century garment of my choosing for this project. The costume collection only has female half scale forms so that restricts me to garments worn by women during this time period. The book used for the historical costume classes is Survey of Historic Costume by Totura and Eubank (2005) (There's a new edition available on Amazon) and will help aid me in the choice of costume to recreate. For this blog I will be referring to the 4th edition. The section on 17th century women's dress in my edition is fairly brief, with a handful of illustrations of 17th century dress and some textual descriptions. While it is easy to find other sources on 17th century dress (which I will be using) the students in the history classes will only be using the Survey book. For this reason I am choosing to make a garment that fits the typical description of dress for women that the students should be able to identify using the information from their textbook.

In Survey of Historic Costume the discussion of women's dress is broken up into three time periods: 1630-1660, 1660-1680 and 1680-1700. The dress in the period of 1630-1660 had many elements similar to the time period before hand, and the dress of the time period from 1680-1700 was already beginning to show transition to the more commonly known silhouette of the 18th century. The dress in the time period of 1660-1680 was the most unique of the period, with a distinct exaggerated bodice and full sleeves. However, this style of dress is the least discussed in the book. Due to the unique shaping of the dress however, the silhouette of the garments from 1660-1680 should be the easiest for the students to be able to identify. 

Totura and Eubank (2005) describe the silhouette of women's fashion from 1660-1680 as "bodices lengthened and narrowed, becoming long-waisted and more slender with an extended V-shaped point at the front...frequently edged by a wide lace collar or band of linen called a whisk, necks tended to be low, wide and horizontal or oval in shape. Most sleeves were set low on the shoulder, opening into a full puff that ended below the elbow" (p. 213). Looking at paintings from the time period like the Portrait of a Married Couple in the Park from 1662 by Gonzales Coques, and Abraham del Court and his wife Maria de Kaersieter from 1654 by Bartholomeus van de Helst the women in the painting are wearing the silhouette Totura and Eubank describe as typical noble dress of the mid 17th century. 

Totura and Eubank (2005) stress that much evidence of costume from the 17th century comes from paintings, and that is is important to note that paintings could be misleading, and are not always reliable sources of information on dress. Painters made up garments and painted people that had long been dead in modern garments (p. 204). For this reason I will be using more than one source for this project, namely the information on the extant 17th century dress housed at a The Museum of Costume in Bath, England. The image of the Bath dress below is courtesy of The Dreamstress, who made her own recreation of a 17th century dress and has so generously provided a number of links to sources on dress in this time period. 

The best thing about doing historical recreation is that there are so many people that are into it that it is so easy to find amazing sources of information!  For example this photo gallery posted by Cathy Hay shows all of the detail and construction on the Bath garment: Warning: Costume Porn. Feast your eyes! This garment is one of only a handful of surviving pieces from this time period and is in wonderful condition. One of the first things to notice is the clear two piece construction of the garment. The bodice is worn over a chemise and has a tabbed bottom. The tabs are all worn below the waistline of the skirt, except the front point which is pulled to up over the waistband.  The half scale garment I create will be made the same way.

While this is going to be a historical recreation that I eventually intend to submit to Costume Society of America as a design scholarship project, I am limited on certain aspects of the design. First of all, this project is to be completed as a GTA assignment, so I am limited on the cost and time of the project. My aim is to use period accurate materials where I can and historical sewing techniques when possible. I am working on a half scale so things like boning and size of embellishment will need to be adjusted so the garment looks balanced to the size of the form. Garments of this time were usually made of silk satin. Because this garment will have to last a long time and is to be done as an assistantship research project, I will likely choose a less expensive fabric to keep the cost of the project as low as possible. I will likely need to choose other fiber contents besides silk for the body of the dress. 

There is much much more to go through with this project so keep an eye out here for more updates! 

Tortora, P., & Eubank, K. (2005). Survey of historic costume: A history of Western dress (4th ed.). New York: Fairchild Publications.